
In December 2023, Mikrotik delighted its users with a new update that brought something many had been eagerly awaiting. The new firmware separated the WiFi drivers for some older access points (CAP AC) from newer ones with WiFi6 support. This allowed them to fit the Wave2 driver onto devices with 16 MB of ROM. This means that older CAP AC dishes can now be added to the new CAPsMAN along with AX series access points, allowing you to manage the entire service in one place.
I’d like to remind you that the Wave2 package was originally a native Qualcomm driver, allowing for more advanced features of the chips of the same name. The custom Mikrotik driver lacked WPA3 support, control frame encryption (802.11w), beamforming, MuMIMO, and proper roaming (802.11r/k/v).
Now, let’s move on to setting up the capsman. My kit includes a Mikrotik HAP ax3 and two Mikrotik CAP Acs.
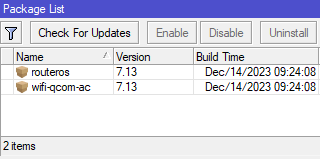
- First, update the firmware of all devices to version 7.13 or higher. And immediately download the archive with additional extensions, which will contain the driver packages. For HAP AX (ARM64), the package is called wifi-qcom-7.13-arm64.npk. For CAP AC (ARM), select wifi-qcom-ac-7.13-arm.npk. After updating to CAP AC, you’ll need to disable the «Wireless» package. The resulting package list on CAP AC should look like this:
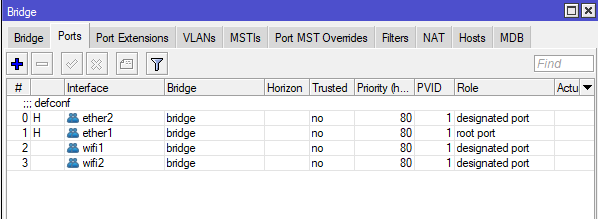
- From now on, there’s no CAP template in Quick Set, so you’ll have to do everything yourself. :) Clear the access point configuration and configure the network using your preferred method (DHCP or manually, it doesn’t matter). Be sure to create a bridge in advance and manually add the Wi-Fi interfaces to it, as Datapath no longer handles this functionality in the new Capsman (this may be temporary). In my case, Wi-Fi clients go directly to the LAN, so I simply add all the access point interfaces to the bridge.
UPD:
2.1 If you need to add additional SSIDs (for example, a guest network), keep in mind that virtual interfaces also need to be added to some kind of bridge. My example will involve a network for IoT devices, with all the bells and whistles that prevent legacy clients from working properly disabled.
There are two possible solutions to this problem:
a) Add an entry to the datapath of each point pointing to a specific local bridge
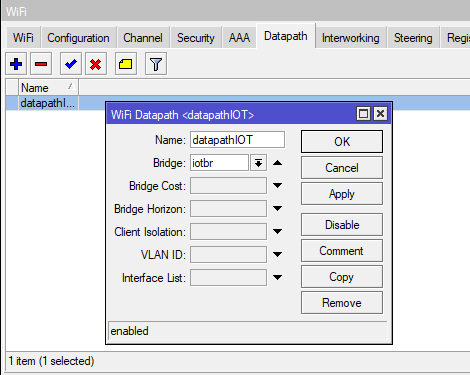
Then go to the WiFi section, click the CAP button, and select the datapath in the Slaves Datapath field. This way, all virtual WiFi interfaces will automatically pick up this setting.
b) We can enable the Slaves Static checkbox, and in this case, the virtual interfaces will become static and will not suddenly change names and disappear from the bridges where they were added manually.
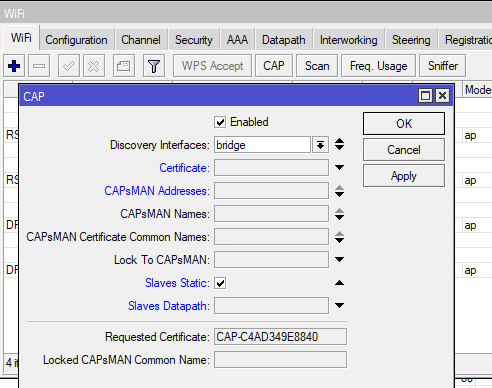
- Go to the WiFi section, click on CAP, check the Enabled box, and enter all the necessary information. In my case, I added the controller’s IP address for reliability.
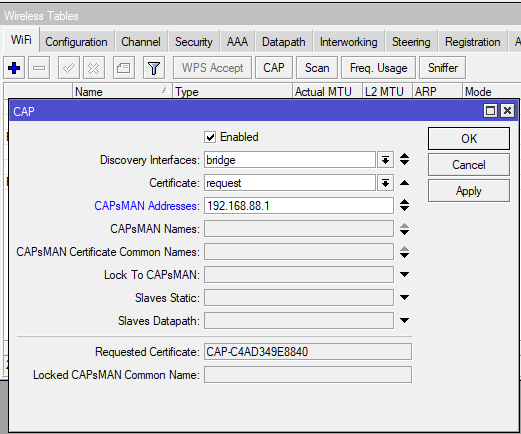
Previously, this window required you to specify which WiFi interfaces the controller would manage. Now, it’s done a little differently. Go to the Configuration tab in each interface’s settings and set Manager: capsman.
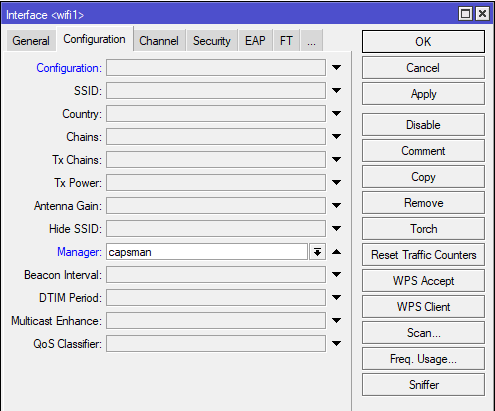
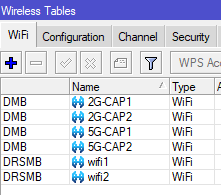
Important! When configuring WiFi interfaces on the controller itself (if any), you must specify Manager: local, otherwise they won’t work! This is because in the new version of RouterOS, profiles for local and remote interfaces are created in the same location, and local interfaces can easily use what we created for capsman. This doesn’t change anything, except that in the list of wireless interfaces, local ones won’t have the name templates from provisioning applied to them, and they will retain their original names.
Except for minor details like changing the password, disabling unnecessary services, etc., the access point setup is complete. We’ll do the same for the other access points and move on to the controller.
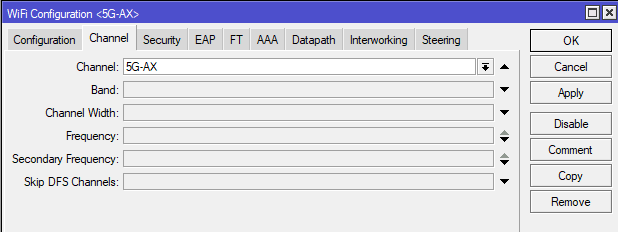
- Log into Mikrotik, where we’ll find the controller (in my case, a HAP ax3), go to the WiFi menu, and click the Channel tab. Since our zoo includes
various 802.11ax-enabled accesspoints and those that don’t, we’ll create separate settings for each device.
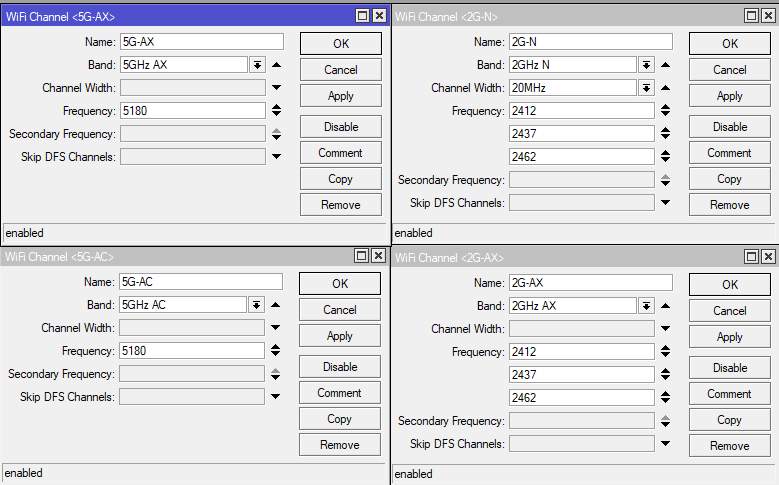
In the 2.4 GHz N configuration, I intentionally reduced the channel width to 20 MHz to ensure a more reliable connection with smart home devices. Unfortunately, their cheap Wi-Fi modules can be very finicky. But no one else in my house uses 802.11n except for the IoT, so everything is fine. If you don’t specify anything for the channel width, the interface example is the largest supported value.
There’s only one 5GHz frequency, and it’s the lowest in the range. Why? Simply because 5G isn’t particularly long-range, so it barely overlaps with anything in my home. Meanwhile, the 5180 frequency with its 80MHz extension is guaranteed to be supported by any 802.11ac-capable client. Trying to set it to auto-select almost always resulted in problems for me. Got the channel issue sorted? Let’s move on…
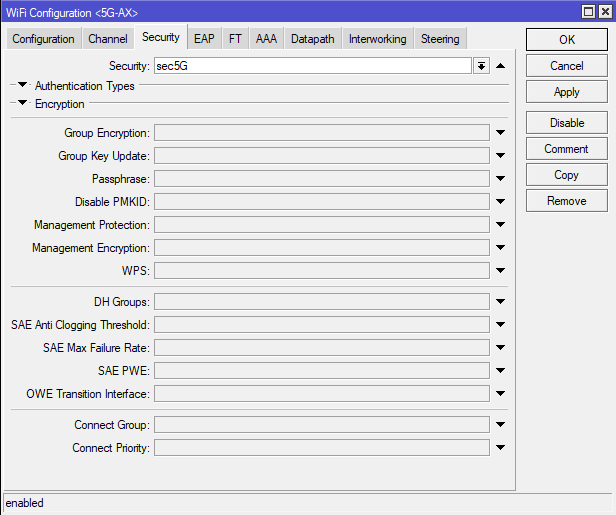
- Go to Security and create the required profiles. Depending on your goals, you can create either one general profile or several. I’ve divided them into 2G and 5G.
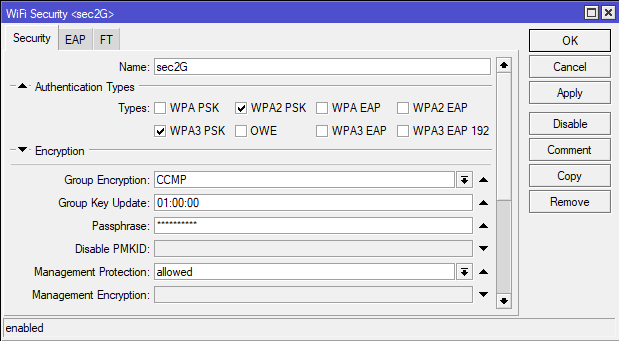
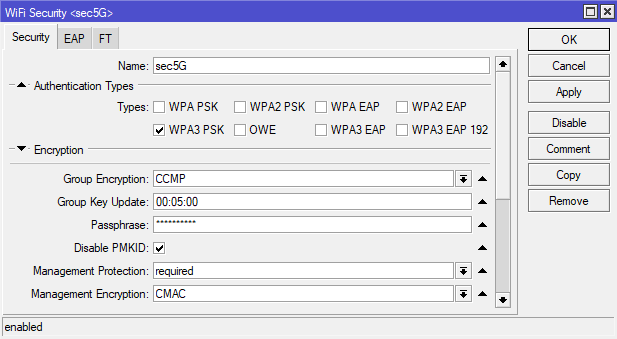
Since 5G clients are guaranteed to support WPA3 and Management Protection, they can safely use only this type of authentication and encryption. In the case of 2G, compatibility with older devices must be ensured.
UPDATE: As described above, I did create a virtual SSID for the IoT and disabled WPA3, control channel encryption, and Fast Transition in its configuration. This means the 2.4G network for all other devices can now be configured to the same settings without worrying about devices with neutered chips crashing. There’s still a chance you’ll experience issues with Apple devices, but you’ll have to see for yourself. ;)
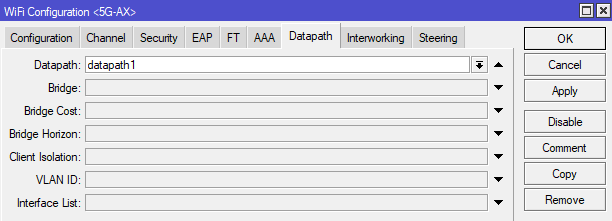
- Go to Datapath and click on the plus sign.
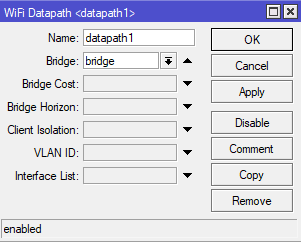
There’s a caveat here. The bridge specified in Datapath will only apply to the controller’s local interfaces. All remote interfaces, as I mentioned above, must be manually added to the bridges directly at the access points, otherwise nothing will work.
- Go to Configuration and collect configs.
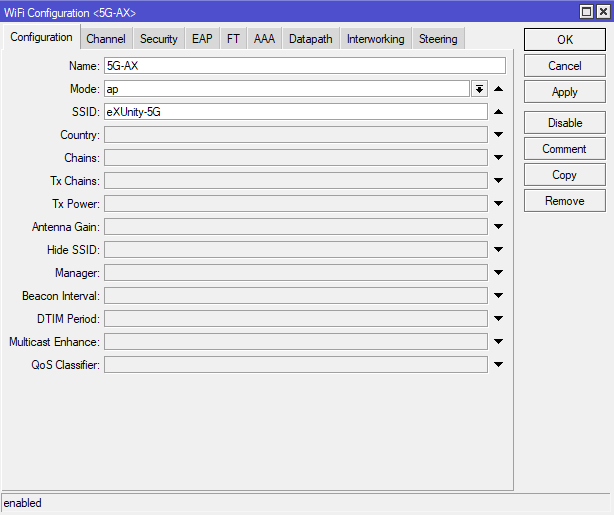
* Don’t set ANYTHING in manager! I don’t know what the point is, but if I specify capsman there, nothing works at all.
** SSIDs for ax 5G and ac or ax 2G and n access points can be set to the same or separate values. The latter option is needed if you need to connect specific devices to specific networks for greater stability or speed.
*** Selecting a country in the configuration isn’t just for show; it sets the permitted frequencies and the permissible transmitter power. Detailed values for each country can be found here . Spoiler: If you select Panama, you’ll be able to dry your socks at the dots. ;)
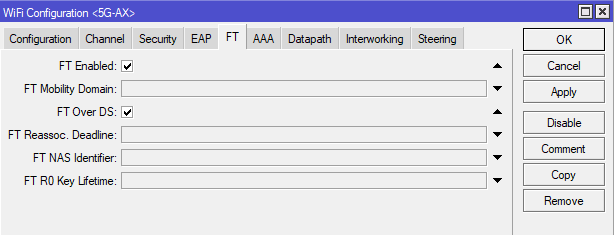
Enable Fast Transition (802.11r). This feature ensures caching and distributing the client authentication cache between domain members. Incidentally, according to experts, this feature significantly speeds up authentication via Radius and is almost unnoticeable with standard WPA2/3 PSK. Keep in mind that FT may cause connection issues for some devices.
I won’t show screenshots of all the configurations. They simply need to be built in the same way as the first one, selecting the corresponding interface profiles in each tab.
8. Steering. Add an entry and specify a neighboring group. If WiFi zones are separated (by floors, buildings, etc.), groups should be separated, as there’s no point in circulating a list of all WiFi stations the client definitely won’t reach. RRM (802.11k) is responsible for distributing to clients a list of base stations operating in the group, along with a description of the signal, channels, and supported bands. WNM (802.11v) is responsible for access points sending requests to clients to move to points with more optimal signal conditions.
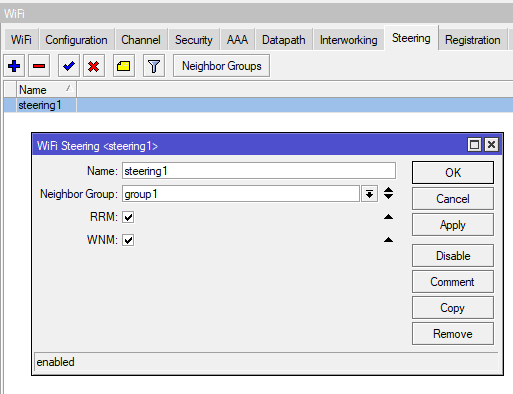
Don’t forget to add it to the configuration.
- We go to Provisioning and create elements for each transponder type. Assign a master configuration, as they say, to each according to its capabilities and needs. :)
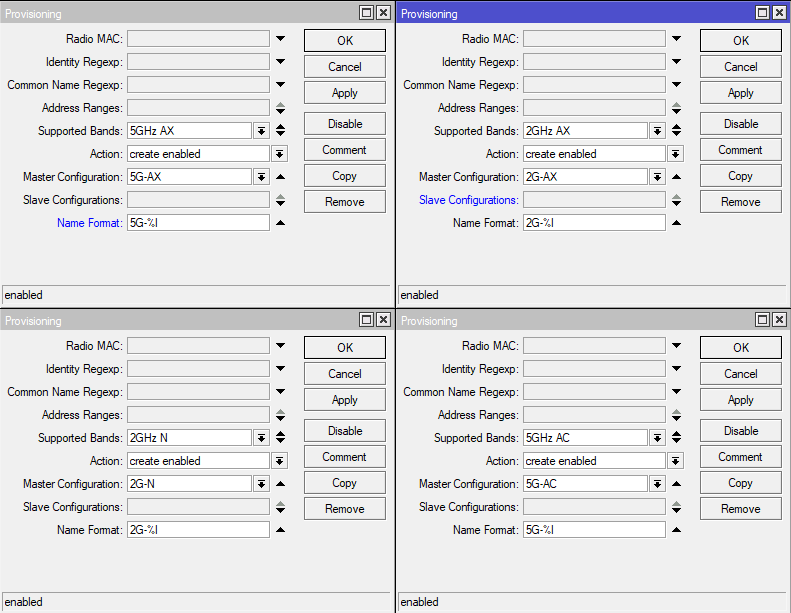
- Go to Remote CAP, click CAPsMAN, and enable it. You can enable certificates if you wish and for security reasons. This is in case some rogue controller suddenly shows up on your network and steals your access points. Or maybe they’ll steal your WiFi password along with your configuration from the controller? I don’t know if it’s transmitted in plaintext, so maybe I’m just talking nonsense. ;)
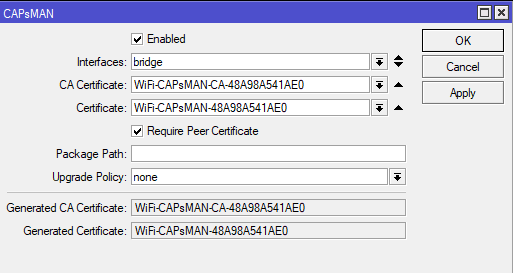
Important! If you decide to use certificates, first obtain them for each access point by connecting to Capsman with the Certificate: request parameter (configured in each access point, in CAP). Then, replace «request» with the received certificate. Only then enable «Require Peer Certificate» in the controller.
If something goes wrong, make sure that the firewall on the controller does not block ports 5246, 5247 udp, through which the access points connect to the Kapsman.
If everything is ok, the Radios tab will look something like this.
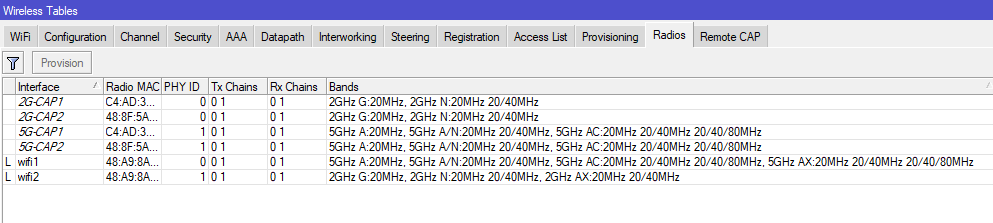
And in Registration, in turn, information will appear about which clients connected to which points.
Looks like that’s it! :) We’re running around the room, checking how it works…
P.S.
And if you, my dear reader, find any errors or inaccuracies in this article, please contact me via Telegram! My contact information is available in the relevant section of this website.